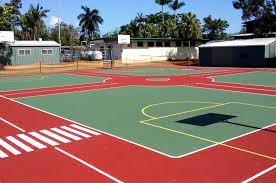
For basketball enthusiasts in Brisbane, having a backyard basketball court can be a dream come true. The joy of practising your shots, perfecting your dribbling skills, and engaging in friendly matches with friends and family is unparalleled. This guide will walk you through the easy steps to install a backyard basketball court in Brisbane, turning your outdoor space into a haven for hoops.
Step 1: Planning and Design
Before you start digging and pouring concrete, it’s crucial to have a well-thought-out plan. Consider the space in your backyard, the dimensions of a standard basketball court installation in Brisbane, and any local regulations or zoning restrictions. Sketch a rough layout and visualize where the court will fit best. Consider sunlight, surrounding vegetation, and drainage to ensure optimal playing conditions.
Step 2: Gather Materials and Equipment
Once you have your design in mind, it’s time to gather the necessary materials and equipment. You’ll need concrete, rebar, wood forms, a basketball hoop and pole, levelling tools, tape measures, and paint. Ensure you have everything ready before you begin the installation process.
Step 3: Site Preparation
Clear the area where the court will be installed. Remove any obstacles, rocks, or debris from the site. Use stakes and string lines to mark the court’s boundaries accurately. Prepare the ground by levelling it as much as possible. This step is crucial to ensure a smooth and even playing surface.
Step 4: Excavation and Foundation
Begin excavating the marked area to a suitable depth. The depth will depend on factors like the soil type and the climate in Brisbane. You may need to dig several inches to a foot deep to accommodate the foundation layers. Once the excavation is complete, compact the soil and lay a layer of gravel for better drainage. Place a layer of sand on top of the rock to create a stable base for the concrete.
Step 5: Formwork and Reinforcement
Create formwork using wooden planks to outline the court’s edges. Secure the formwork with stakes and ensure it is level and straight. Next, lay a rebar grid across the area to reinforce the concrete. They will add strength and durability to your basketball court.
Step 6: Pouring and Leveling Concrete
Now comes the exciting part – pouring the concrete. Mix the concrete according to the manufacturer’s instructions and run it into the prepared area. Use a screed board to spread the concrete evenly and level it with the formwork. Work methodically, section by section, to ensure a smooth finish.
Step 7: Curing and Finishing
After the concrete is poured and leveled, cover it with plastic sheeting to prevent it from drying too quickly. This process, called curing, allows the concrete to gain strength gradually. During this time, you can add finishing touches, such as a basketball key, a three-point line, or your logo to the court.
Step 8: Installing the Basketball Hoop
Once the concrete has cured sufficiently (usually after a week), it’s time to install the basketball hoop and pole. Follow the manufacturer’s instructions to attach the ring to the bar securely. Make sure it’s positioned at the regulation height of 10 feet.
Step 9: Court Markings
Using high-quality paint, mark the court lines, including the free-throw, three-point, and any other markings you desire. Use stencils for precise and professional-looking markings.
Step 10: Enjoy Your Backyard Basketball Court
With the basketball hoop in place and the court markings complete, it’s time to enjoy your newly installed backyard basketball court. Invite friends, family, and neighbors for friendly matches, practice your skills, and immerse yourself in the joy of playing the game you love right in your backyard.
Step 11: Maintenance and Care
While your backyard basketball court is now ready for action, it’s important to remember that regular maintenance is key to keeping it in top shape for years. Here are a few maintenance tips to consider:
Cleaning: Sweep the court regularly to remove debris, leaves, and dirt. Use a hose to wash away any stubborn stains or spills. Keeping the surface clean ensures better traction and a safer playing environment.
Sealing: Depending on the type of concrete used, consider applying a concrete sealer to protect the surface from water, UV rays, and general wear and tear. They can help prolong the life of your court and maintain its appearance.
Inspecting the Hoop: Periodically check the basketball hoop and pole for any signs of damage or wear. Lubricate moving parts and tighten bolts to keep the circle stable and safe.
Repainting: Court markings may fade over time due to weather conditions and play. Repaint the lines and markings to keep the court looking fresh and regulation-compliant.
Step 12: Community Engagement
Your new backyard basketball court can also be a hub for community engagement. Invite neighbors, friends, and local youth to enjoy the court and play friendly games. This brings people together and promotes a healthy and active lifestyle within your community.
Step 13: Enhancing the Experience
To take your backyard basketball court to the next level, consider adding some additional features:
Seating: Place benches or seating areas nearby so players and spectators can comfortably enjoy the games.
Lighting: Install outdoor lighting around the court to extend playtime into the evening hours.
Scoreboard: Add a simple or digital display to track game scores and time.
Landscaping: Surround the court with landscaping to create a visually appealing and inviting space.
Step 14: Legal Considerations
Before you invite friends and neighbours to your backyard court, it’s a good idea to understand any potential legal liabilities. While friendly games are generally low-risk, it’s wise to consult with your insurance provider to ensure you have appropriate coverage in case of accidents.
Step 15: Sharing the Joy
As you enjoy your newly installed backyard basketball court, remember to share your experience with others. You can document the installation process, maintenance tips, and memorable moments on social media or through a blog. Your journey could inspire others in Brisbane and beyond to create their basketball haven at home.
Conclusion
Installing a backyard basketball court in Brisbane is a rewarding endeavor that transforms your outdoor space into a place of excitement, exercise, and community. Following these easy steps makes your dream of shooting hoops in your backyard a reality. From careful planning and precise installation to regular maintenance and community engagement, your basketball court will become a cherished asset for you and those around you. So, lace up your sneakers, grab the ball, and embrace the thrill of Brisbane hoops right in your backyard.
Installing a backyard basketball court in Brisbane might seem daunting, but you can turn your dream into a reality by breaking down the process into easy-to-follow steps. From planning and site preparation to pouring concrete and installing the hoop, each step creates a space to unleash your basketball passion and have endless fun. So, gear up, lace up your sneakers, and get ready to shoot some Brisbane hoops on your backyard court.